Image classification with ResNet50
Doing cool things with data doesn't always need to be difficult. By using ResNet-50 you don't have to start from scratch when it comes to building a classifier model and make a prediction based on it. This article is an beginners guide to ResNet-50. In the following you will get an short overall introduction to ResNet-50 and a simple tutorial on how to use it for image classification with python coding.
What is ResNet-50 and why use it for image classification?
ResNet-50 is a pretrained Deep Learning model for image classification of the Convolutional Neural Network(CNN, or ConvNet), which is a class of deep neural networks, most commonly applied to analyzing visual imagery. ResNet-50 is 50 layers deep and is trained on a million images of 1000 categories from the ImageNet database. Furthermore the model has over 23 million trainable parameters, which indicates a deep architecture that makes it better for image recognition. Using a pretrained model is a highly effective approach, compared if you need to build it from scratch, where you need to collect great amounts of data and train it yourself. Of course, there are other pretrained deep models to use such as AlexNet, GoogleNet or VGG19, but the ResNet-50 is noted for excellent generalization performance with fewer error rates on recognition tasks and is therefore a useful tool to know.
Architecture of ResNet-50
ResNet stands for Residual Network and more specifically it is of a Residual Neural Network architecture. What characterizes a residual network is its identity connections. Identity connections takes the input directly to the end of each residual block, as shown below with the curved arrow:
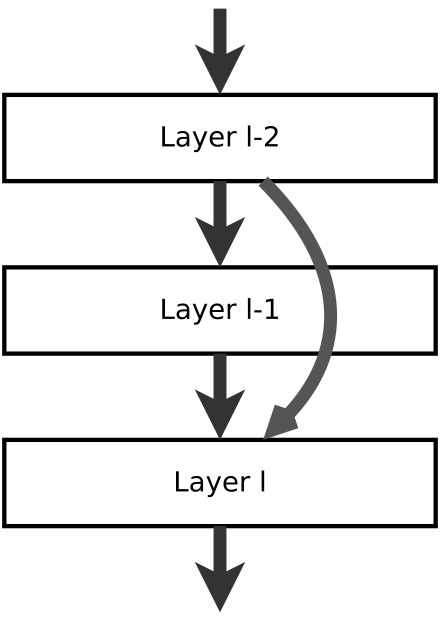
Specifically, the ResNet50 model consists of 5 stages each with a residual block. Each residual block has 3 layers with both 11 and 33 convolutions. The concept of residual blocks is quite simple. In traditional neural networks, each layer feeds into the next layer. In a network with residual blocks, each layer feeds into the next layer and directly into the layers about 2–3 hops away, called identity connections.
Classification case: Labrador Retriever
In this example we are using Google Colaboratory to do the code. You can use this link to get an introduction to Colab and create your own code in python: [https://colab.research.google.com/notebooks/welcome.ipynb] (https://colab.research.google.com/notebooks/welcome.ipynb)
And here is the link to our Google Colab notebook, so you can se the codes in action: https://colab.research.google.com/drive/1vF7AfZFil84TJALYGz8VuVTyO-PW1MZE
When using colab, first, remember to change the runtime to GPU or else it will take a while when working with these deep learning networks.
Lets get started!
Step 1: Import of the necessary libraries First step is to import the necessary libraries needed to classify the images. In this case you need to use numpy, keras and matplotlib.
#Importing libraries
import numpy as np
from keras.preprocessing.image import image
from keras.preprocessing.image import img_to_array
from keras.applications.resnet50 import preprocess_input
from keras.applications.resnet50 import ResNet50, decode_predictions
import matplotlib.pyplot as plt
Step 2: Read and unzip the file To download the dataset file into Google Colab it is useful to use the !wget command.Then it will be added to your file repository in colab and from there you can create a path way to the image or dataset you want to use.
Next is to unzip the file using the !unzip command and the full name of the file.
There are certainly other ways to load your dataset, but we find this to be the most simple way.
# Let's download and unzip the data
!wget -qq http://sds-datacrunch.aau.dk/public/dataset.zip
!unzip -qq dataset.zip
Step 3: Preprocessing images for ResNet50
To preprocess a picture first load a picture from the dataset. Here set the right target size which for Resnet is 224*224.
Now the image is readable and it can be plotted.
#First we load the image from our data set, setting the taget-size to 224, 224
#Since that is the format ResNet reads.
img = image.load_img('dataset/single_prediction/cat_or_dog_1.jpg',
                     target_size = (224, 224))
#Checking the image
plt.imshow(img)
Keras is expecting a list of images which is why you need to turn it into an array and then add another dimension to this. Following this you need to normalize the image using preprocess input method.
#Here we turn it into an numpy array
img = image.img_to_array(img)
#np.expand_dims(xx, axis=0) Insert a new axis that will appear at the axis
#position in the expanded array shape.
img = np.expand_dims(img, axis=0)
#Preprocessing the numpy array encoding a batch of images
img = preprocess_input(img)
Step 4: Make a prediction Using the ResNet50 model in Keras After preprocessing the image you can start classifying by simply instantiating the ResNet-50 model.
#instantiating the ResNet50 model
model = ResNet50(weights='imagenet')
Now use the model.predict function on the preprocessed image which is called ‘img’. To also print the prediction, use the print function and put the decode_prediction in the print argument and ‘preds’ in the decode_prediction argument.
#predicting on the model and printing the result
preds = model.predict(img)
print('Predicted:', decode_predictions(preds, top=1)[0])
As you see, our ResNet50 model easily classified the picture correct as a Labrador Retriever!
You can easily do this with other datasets. You can download other image datasets from:
Reference List:
https://arxiv.org/pdf/1512.03385.pdf
ttps://towardsdatascience.com/understanding-and-coding-a-resnet-in-keras-446d7ff84d33
ttps://medium.com/datadriveninvestor/residual-network-architecture-8e478adabfec
ttps://www.mathworks.com/help/deeplearning/ref/resnet50.html